
Introduction
ESPHome is a open source project that allows you to quickly build custom smart home solutions based on the microcontroller ESP8266 or ESP32, without the need to be a coding master. So creating your own home project has never been easier than it is with ESPHome. The new version lets you connect to your ESPHome to any computer you might be working. It doesnt have to be your home computer, as you can now upload the code over your browser.
The data exchange in ESPHome is done through YAML. YAML is a relatively simple language, so if you already know and have experience with coding you should be able to get up to speed fairly quickly by reading the specification and some examples, and practicing with YAML files. If you want to learn how to code then learning it through the use of ESPHome is an effective, fun and interactive way of getting started. This blog will refer to links that will help you get started with YAML.
Some of the things you can do with ESPHome include:
-
Control lights and switches
ESPHome allows you to create custom firmware for your ESP8266 or ESP32-based devices that can control lights and switches. You can use it to turn lights on and off, dim them, and change their color. -
Monitor sensors
ESPHome supports a wide range of sensors, including temperature, humidity, pressure, and more. You can use it to monitor the environment and trigger automations based on sensor readings. -
Build custom devices
ESPHome provides a flexible platform for building custom devices using ESP8266 or ESP32 microcontrollers. You can create your own custom sensors, switches, and other devices and integrate them with your home automation system. -
Integrate with Home Assistant
ESPHome integrates seamlessly with Home Assistant, a popular open-source home automation platform. This allows you to easily control and automate your devices using Home Assistant's user interface and automation engine. -
Create custom automations
With ESPHome, you can create custom automations that trigger based on various events, such as sensor readings, button presses, or time of day. You can use these automations to control your devices or trigger other actions in your home automation system.
It basically makes your home smarter. So let's get started! To implement your ESPHome device, you will need to follow these general steps presented in the next section.
ESPHome - Getting started
The general steps are:
- Install ESPHome
- Configure your device
- Write/find the code
- Compile and upload
- Test and debug
So let's start at the top!
Install ESPHome
The first step is to install the ESPHome software. You can do this by following the installation guide on the ESPHome Website.
The installation might be the most complex part of ESPHome, but with a little coffee and maybe some breathing exercises or meditation, we should be able to install it without much trouble. If the link above doesn't work out for you, then try and follow the guidelines explained in the youtube video that is linked below.
This Youtube Guide might help you with the installation for ESPHome. In this youtube video it is explained that you might need some drivers for your computer that are compatible with your ESP device. You can find and download these drivers through the links below. If one doesn't work, then try the other.
ESP drivers:
ESP driver from GitHub
ESP driver from Silabs
Configure your device
Once you have ESPHome installed, you need to configure your device. To do this, you will need to create a YAML configuration file that describes the features and behavior of your device.
YAML is designed to be easily read and written by humans, using a simple syntax. It is also easy for computers to parse and generate, making it a well-suited choice for ESPHome. YAML files consist of key-value pairs, where the key is separated from the value by a colon and whitespace. Values can be of various types, including strings, numbers, lists, and maps (key-value pairs).
If you want to learn more about YAML, you can find information about it in the following links:
YAML Tutorial
YAML Getting Started
Many programming languages have libraries or tools that can be used to work with YAML files. The documentation for these libraries or tools often includes examples and usage instructions. For example:
PyYAML for Python
YAML.NET for .NET
Jackson YAML for Java
Write/find the code
After you have created the configuration file, you will need to apply the code for your device. This will involve specifying the various components and their settings, as well as any custom code you want to add. Do remember that ESPHome is open source software. This allows users to freely use, modify, and distribute the software, as long as they follow the terms of the license. This means that anyone can download, use, and modify the ESPHome software without having to pay any licensing fees or royalties. Such premade configurations can fx. be found on the ESPHome Website - DIY Examples.
Compile and upload
Once you have written your code, you will need to compile it and upload it to your device. ESPHome provides a tool called esphomeyaml that allows you to do this easily.
Test and debug
After you have uploaded your code to your device, you should test it to make sure everything is working correctly. If you encounter any issues, you can use the ESPHome logs to debug and troubleshoot.
This will cover the ESPHome - Getting started section, and we will now continue with a ESPHome Basic Configuration walktrough.
ESPHome Basic Configuration walktrough
So lets get started with our first node and name it so we easily know and can remember what its functions are. We need to enter our Wi-Fi SSD and Wi-Fi password.

When we click next after we have entered the information we are asked to connect our ESP devices to our computers.

When the microcontrollers are plugged into your computer we click connect and a little window should pop up, like so:

If you can't find the USB Serial option in the window from figure 3 your computer might need some ESP drivers, which can be downloaded through the links mentioned in the blog here.
We then click on the USB Serial one and after we give our computers some thinking time, then this concludes our basic config for ESPHome.
We now see our first config under the 'ESPHome'.

(The red bar over the configuration will turn green when the device is online.)
Lets go through the UI - Edit, validate, install and log.
Edit
This if for editting our config. If we click on it, it shows us our YAML configuration that ESP uploaded to our device.
Validate
Makes sure that the configugarion is valid - checks for mistakes and errors.
Install
This reapeats the process we just went through. So if you make changes and udpdates to your configuration, you want to hit install to implement them.
Log
Keep track of what is going on.
And if you want to add another configuartion, we have the green (+) in the buttom right hand corner.
If we press 'Edit' we see the name of the device at line 1.

This name is also how the device is going to show up in the home assistant, so pick a descriptive name so you know what it is like fx. "temperature sensor". This is also the name that will be showcased on your router.
At line 2 we see the platform that are in use. ESPHome will automatically detect which board is plugged in and adjust this for you.
And at line 3 we have the exact board showcased. As of writing this you might need to writ your board that you are using, but in the future ESPHome will be able to detect and adjust this for you as well. You can find the compatible boards on ESPHome's Website, to assure you write the board name correctly.
Next up at line 7 we have the 'logger'.
This enable the logs so you are able to view the logs or the serial and console of your esp device over the network.
The api at line 10 is required for using Home assistand. This is how Home Assistant communicates and talks to your board. You can make a password for this by going to the line right below and write "password:" followed by the password you wish to use.
Ota (over the air), line 12, is the password that is required if you want to update the flash over the air, so that anyone can't just upload firmware to your esp device - you don't want that. You don't need to memerize the password if you only plan on using ESPHome as ESPHome will automatically input the password.
Under that we have the Wi-Fi settings at line 15.
And then we have the 'api' settings at lin 20. What the ap does is if you happen to get your Wi-Fi details wrong or if your Wi-Fi goes down then ESPHome on the ESP8266 and ESP32 will make its own acces point to keep functioning.
Lastly we have the "captice_portal" at line 24 which works together with the 'api' function.
This is a very basic config and ESPHome automatically does this for you so you don't have to type any of these lines in (except maybe for the board that youre using as we mentioned earlier).
Using ESPHome Secrets
To use the Secrets in ESPHome we go back to the front page where we can see our configs and press the three dots at the top right hand corner and press 'Secret Editor'.
This is for keeping your information safe and hidden in your configs.
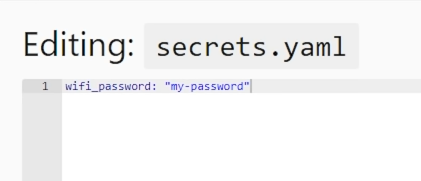
So we can for example open af Secrets folder and write:
wifi_password: "my password". Now we have defined our Wi-Fi password in our secret folder.
Then we can go back and click on the 'edit' button again. For the password for 'wifi' we can now write '!secret wifi_password'. Remember to write the command name exactly as you defined it in the secret file.

If you write it wrong then there will apear a red cross, indicating that there is something in the code that isn't understandable.
When we have defined our Secrets we can click "Save" and hit the "Install" button. A windows pops up asking how we want to safe it. For now we can just click "Install via the browser. Then the window seen in figure 2 pops up, and like before we can choose the 'USB Serial' option and hit connect to implement it.
The little bar over our config should now have turned green because our device is now reporting online.

Check ESPHome logs
After we have achieved our green bar over our config lets take a look at the logs.

This will log the serial logs from the device itself, which can be very useful. The log is real-time and wll automatically update over time. The logs can be used to debug and you might be using and reading the logs a lot. It gives information about everything we have covered so far, and also showcases the online signal strength.
With this setup are we no ready to implement our wanted configurations for our home!
As mentioned earlier these configurations can be found here or they can be written manually.
By using these resources, you should be able to quickly get up to speed with coding in YAML for ESPHome and start creating your own unique custom configurations.
Hopefully this blog will get you started on you ESPHome projects! If there are any further questions or if unexptected problems arise, feel free to write a comment. This will help making this blog more adequate for new users of ESPHome!


1 kommentar
Megan
Good Afternoon,
My name is Megan, from The Akira Team – I just noticed your website through your Entireweb Website Listing, and wanted to get in touch with you right away.
We have a special offer for your website today, and that is 1st Page Rankings in all major search engines (That’s Google, Yahoo and Bing) + social media and video commercial advertising starting at just $29.99 which I am ABSOLUTELY certain will benefit your website and business, by bringing you LOTS of new customers, very very quickly.
Visit useakira.com if you want your website to be at the TOP of Google, Yahoo and Bing, AND we can get you started immediately. Or visit useakira.com/11yearexclusive.html in the next 12 hours for a HUGE half price offer + your 2nd year free of charge.
I look forward to hearing back from you.
Cheers!
Megan
The Akira Team
Executive Page One Relations
bc2ukrfnjn